


FAQ
General
Realwear HMT
Vuzix M300
General
How to access Technical Support
What are Jujotech service hours?
Jujotech service hours are Monday – Friday from 8:00am to 5:00pm
How to open a Service Request with Jujotech?
By Email: support@jujotech.com
Targeted response time is not to exceed 4 business hours
What information is needed to open a Service Request?
When opening a service request with Jujotech the following information must be provided:
Company Name
Contact name
Phone Number
Serial Number
MAC Address
App Release Version
WearMF Version
Customer Configuration – if any
Type of Connection (WiFi, 2G/3G/4G Hotspot, etc.)
Problem description troubleshooting information / Steps taken
Realwear HMT
Getting Started with Fusion Remote for Realwear HMT
How do I get my Skype for Business Organization ready?
Fusion Remote is an Enterprise ready solution for Remote Assist using Skype for Business. To operate Fusion Remote you must already have a Skype for Business account. Depending on your specific Skype for Business organization you may need to contact your IT Administration for support.
Fusion Remote works out of the box with Skype for Business organizations that are online (based on Office 365 subscriptions) and are federated with external domains.
If you do not know what type of Skype for Business Organization your Company has, or if it is either online but not federated, or on premises then you need to contact your IT organization for support.
Please refer to the RealWear HMT User Guide for more details about general HMT operation and installation of apps. The User Guide can be found here
How do I obtain a Fusion Remote Application?
Before proceeding further, please ensure that you or your Company have purchased a license for Fusion Remote and that the application (APK) has been downloaded on your PC.
If you have not purchased the Fusion Remote Application (APK), then please contact: Jujotech Sales, providing the following information:
Company Name
Contact information (Name, email, phone number)
Number of licenses required
Serial number of each device for which you are requesting a license
How do I know that Fusion Remote V1.1 is properly installed and operational on the RealWear HMT-1?
Fusion Remote performs a diagnostics test on startup up. Once started, Fusion Remote will present its login screen if no error is found
Why Fusion Remote V. 1.1 with RealWear HMT-1 is not working after a battery replacement?
- Check that Time and Date are current after each firmware update or battery swap
- Check that WiFi connection is active and with a working Internet connection
- Contact Jujotech technical support at support@jujotech.com
How does Fusion Remote receive updates?
Fusion Remote is updated using over-the-air (OTA) updates which will be pushed out periodically. These can be downloaded and installed via the ‘Wireless Update’ app on HMT devices.
Open the ‘Wireless Update’ application and say, ‘Check for Updates’.
Contact support@jujotech.com for any questions or concerns.
What is WearHF?
WearHF is the RealWear accessibility layer that allows you to control the HMT-1 or HMT-1Z1 using only your voice.
What is WearML?
WearML is a custom markup language that allows customized speech commands within Fusion Remote
Using Fusion Remote with Realwear HMT
How to Prepare Skype for Business User’s Credentials for Use with Fusion Remote
Online Skype for Business Organization
Step 1: Generate the QR Code*[1] corresponding to your SfB username and password, using the following web service: https://fusionremote.YourDomain.com/. For POC and Trials, please access the page at https://fusionremote.jujotech.com
Step 2: On the web page, select the button “Skype for Business Credentials”
Step 3: If you have an Online Skype for Business Organization, select “Online Skype for Business“ on the top dropdown-box
Step4: Enter your Skype for Business Username and Password and hit Encrypt
Step 4: Save or Print the displayed AES encrypted QR Code
Step 5: After launching Fusion Remote, say “Scan QR Code” to scan the QR code you have generated and proceed with authentication
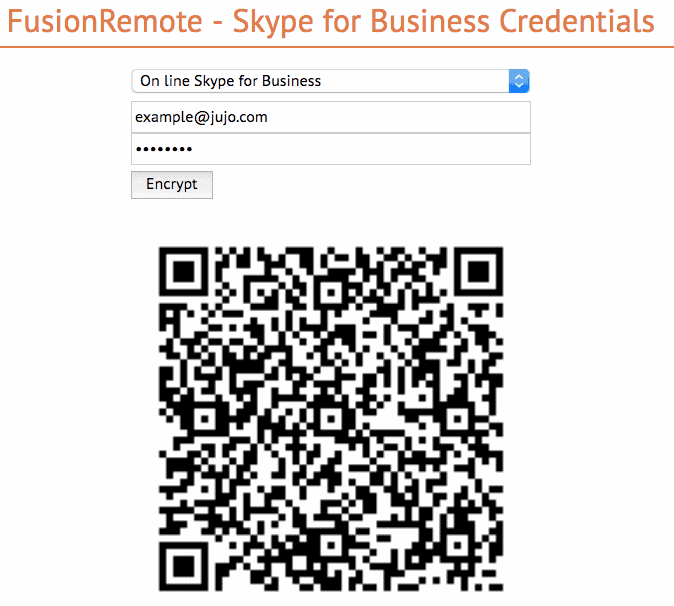
On-Premises Skype for Business Organization
Step 1: Generate the QR Code*[2] corresponding to your SfB username and password, using the following web service: https://fusionremote.YourDomain.com/. For POC and Trials, please access the page at https://fusionremote.jujotech.com
Step 2: On the web page, select the button “Skype for Business Credentials”
Step 3: If you have an On-premises Skype for Business Organization, select “On-Premises Skype for Business” on the top dropdown-box
Step4: Enter your Skype for Business Username, Password, and Domain (domainusername) information; hit Encrypt
Step 4: Save or Print the displayed AES encrypted QR Code
Step 5: After launching Fusion Remote, say “Scan QR Code” to scan the QR code you have generated and proceed with authentication
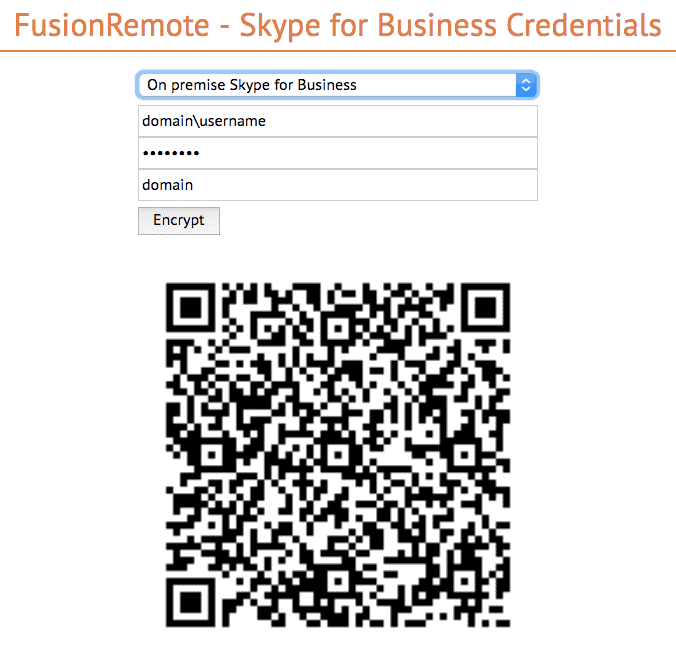
[1] *QR Code: Quick Response Code used to store textual information, which can be decoded using image recognition software
[2] *QR Code: Quick Response Code used to store textual information, which can be decoded using image recognition software
How to Launch Fusion Remote on the HMT
Step 1 “Navigate Home”: to access the “Home Screen (Figure 1)
Step 2 “My Programs”: to access the Launcher Screen (Figure 2)
Step 3 Locate Fusion Remote  icon on the HMT Application Screen (Figure 2)
Step 4 “Fusion Remote”: to start the application
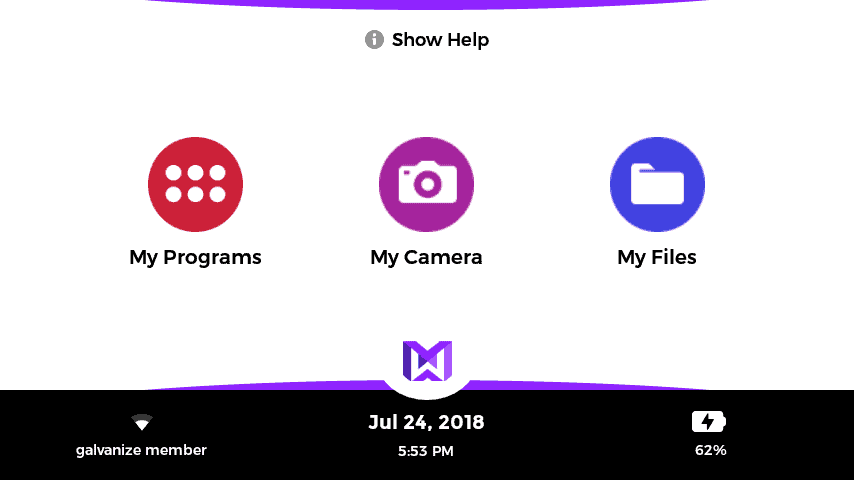
(fig. 1)
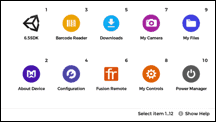
(fig. 2)
 VOICE COMMANDS IN BOLD
How to Acquire User’s Skype for Business Credentials
Once Fusion Remote has launched for the first time, the Scan QR Code Panel is displayed, as shown in Figure 1
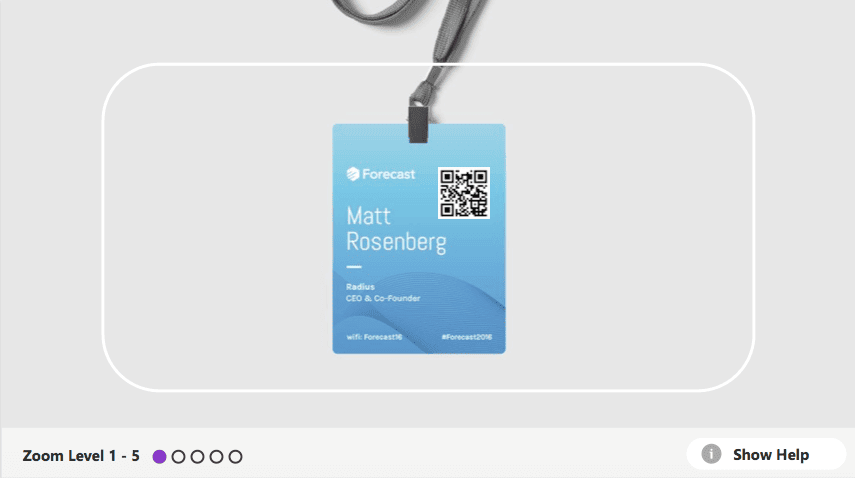
Step 1: “Scan QR Code” to open the integrated Barcode Scanner, as shown in Figure 2
Step 2: Focus on the target QR Code and wait for the HMT feedback sound
Step 3: Once the QR Code is acquired and credentials verified, the username is displayed in Microsoft Skype for Business Login screen.
For On-Premises Skype for Business Organizations, authentication will immediately follow Step 3 and the user will be presented with the Contact List Screen on successful authentication. Please proceed with Section E “How to operate the Contact List” in this case.
For Online Skype for Business Organizations, authentication will follow the steps described in Section D “How to Authenticate on Microsoft Online Skype for Business Organization”.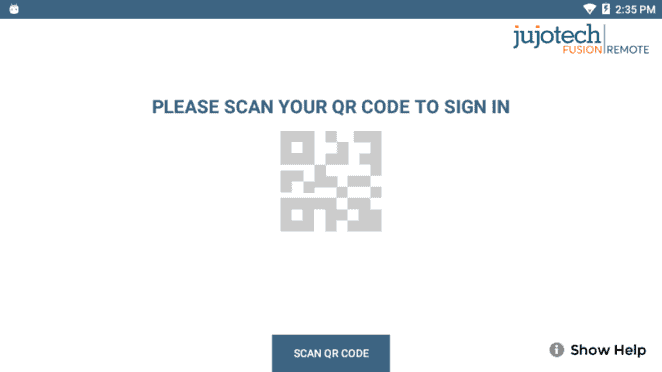
(Fig. 1)
(Fig.2)
VOICE COMMANDS IN BOLD
How to Authenticate on Microsoft Online Skype for Business Server
Once Fusion Remote has launched for the first time, the Scan QR Code Panel is displayed, as shown in Figure 1
Step 1: “Enter Username” fills in the username field
Step 2: “Next” proceeds to step 3
Step 3: “Set Password” fills in the password field
Step 4: “Sign In” executes authentication. If successful, proceeds to step 5; otherwise reenter password (Step 4) or restart from Step 1, as instructed
Step 5: “Yes” maintains authentication after exiting Fusion Remote and proceeds to step 6
“No” requires authentication after exiting Fusion Remote and to proceeds to step 6
Step 6: “Accept” completes process and proceeds to Contact List
“Cancel” cancels the process and returns to Step 1
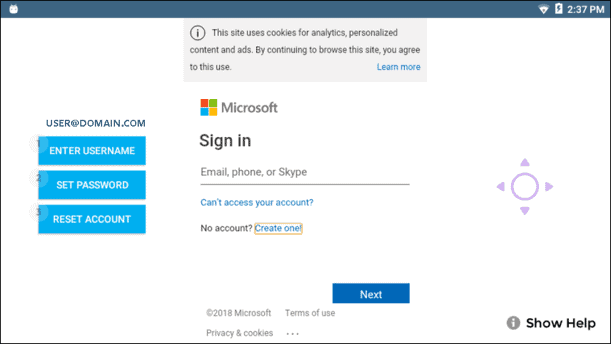
(Fig. 1 – Initial Microsoft Login Screen)
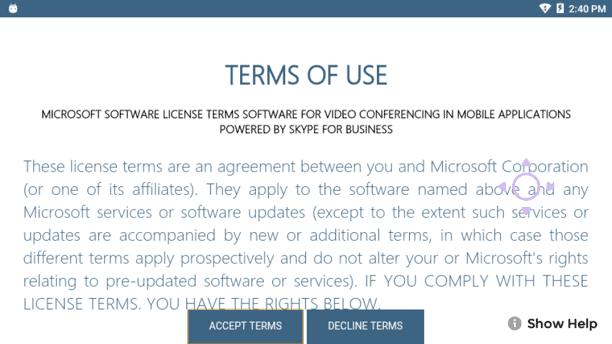
(Fig.2 – EULA Acceptance Screen)
Note: In case a step fails, say “Navigate Back” and repeat the step
VOICE COMMANDS IN BOLD
How to Operate the Contact list
Upon successful authentication, the user’s list of SfB contacts will be displayed, along with user’s presence and login info (upper right corner in Figure 1) and actions
Contact list can be filtered using the following voice commands:
“ONLINE CONTACTS” online contact ordered alphabetically
“RECENT CONTACTS” recent contact ordered alphabetically
“CONTACT NAMES” all contact ordered alphabetically
“CONTACTS WITH “ to scroll the list to the first name starting by
“PAGE UP/DOWN” to scroll up/down a long list of Contacts
A contact name can be selected even if not in the visible portion of the Contact List
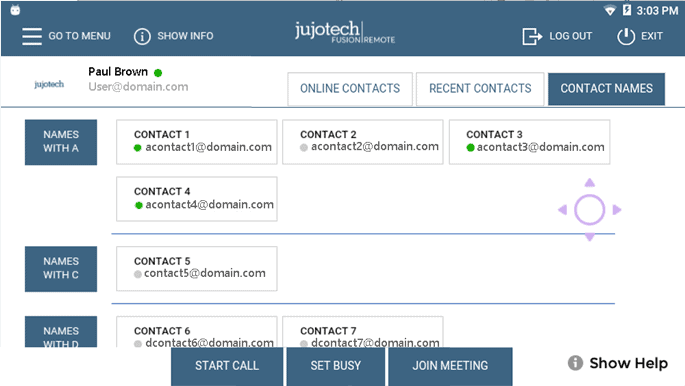
(Fig. 1 – List of Contacts)
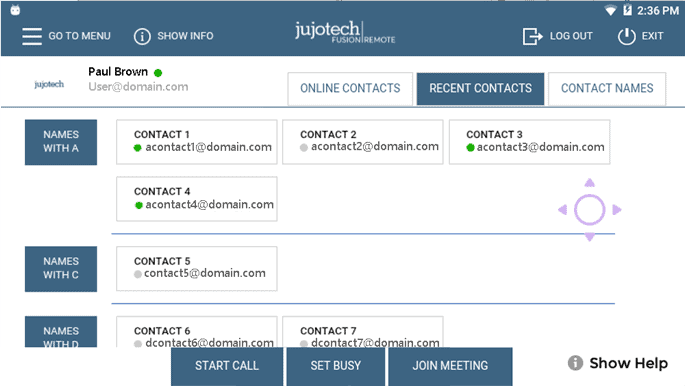
(Fig. 2 – Ordered List of contacts)
VOICE COMMANDS IN BOLD
Step 1: “SELECT ” or “SELECT contact ” starts a call (Figure 1).
In case of selection error, simply repeat. The selected contact will be highlighted
Step 2: “START CALL” initiates a call with the selected contact
The interface during a live call (Figure 2) offers the following commands:
“STOP/START AUDIO” manages the HMT microphone
“STOP/START MY STREAM” manages the PIP Stream
“SELECT MY STREAM” selects the HMT stream to full screen
“SHOW INFO” displays Information Panel
“SHOW/HIDE CHAT” shows/hides the Instant Messaging panel
“TERMINATE CALL” stops the call
“SHOW PARTICIPANTS” shows Participants Panel
“SELECT PARTICIPANT ” or “SELECT ” selects the stream to full screen
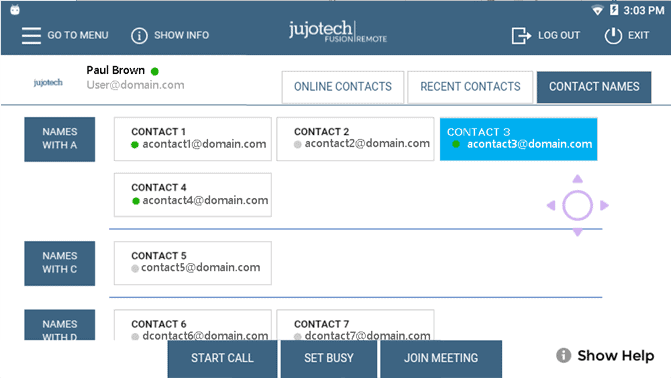
(Fig.1 – Call Initiation)
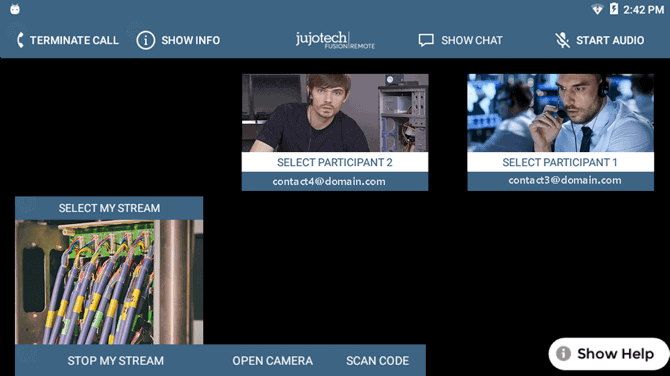
(Fig. 2 – Participants selection during multicast)
VOICE COMMANDS IN BOLD
Live Call – How to Use the Instant Messaging
Text messages can be exchanged between the Remote Expert and the Fusion Remote user using the following voice commands:
Step 1: “Show Chat” opens the Instant Messaging panel
Step 2: “Write Message” writes a message to the Remote Expert
Step 3: “Dictation” starts dictating the message
Step 4: “Accept” enters the text into the message
Step 5: “Send Message” sends the message to the meeting chat
Step 6: “Hide Chat” hides the Instant Messaging panel
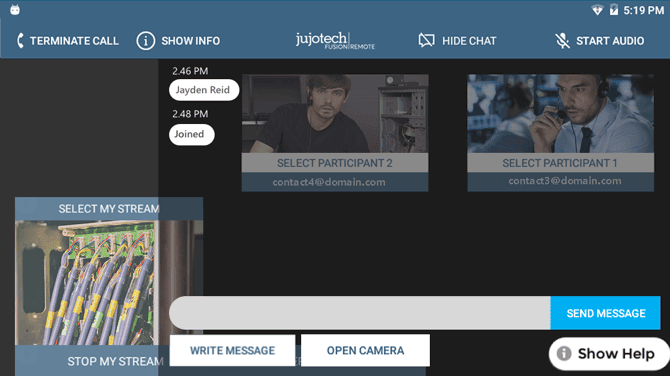
(Fig. 1 – Instant Messaging)
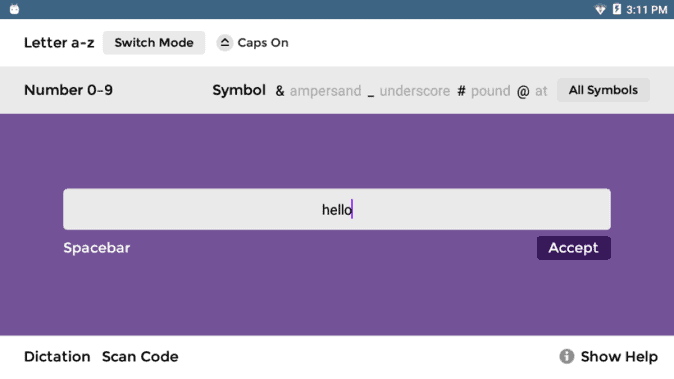
(Fig. 2 – Message Dictation)
VOICE COMMANDS IN BOLD
Live Call – How to Capture and Share an Image or a Video Clip
Text messages can be exchanged between the Remote Expert and the Fusion Remote user using the following voice commands:
Step 1: “Show Chat” opens the Instant Messaging panel
Step 2: “Write Message” writes a message to the Remote Expert
Step 3: “Dictation” starts dictating the message
Step 4: “Accept” enters the text into the message
Step 5: “Send Message” sends the message to the meeting chat
Step 6: “Hide Chat” hides the Instant Messaging panel
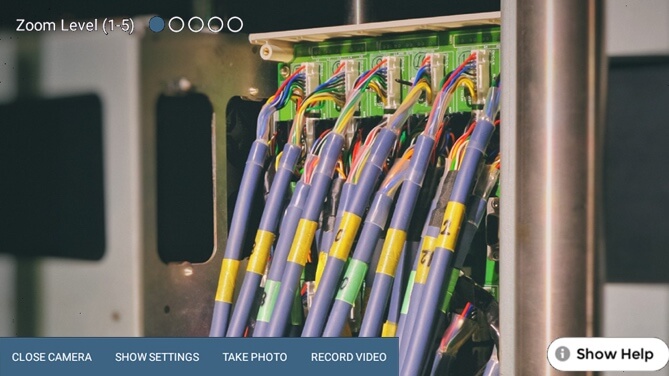
(Fig. 1 – Camera Panel)
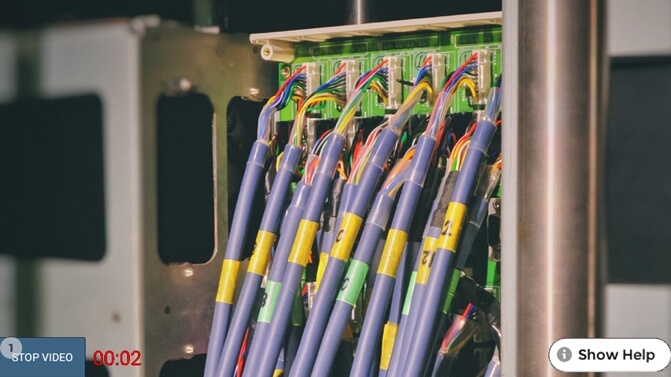
(Fig. 2 – Record Video Clip)
VOICE COMMANDS IN BOLD
Reference Section – List of Voice Commands
User’s Skype for Business Credentials Acquisition
| Voice Command | Action | |
| “Scan QR Code” | Scans an encrypted QR Code with User’s SfB Credentials | |
| “Reset Account” | Deletes stored credentials and open the Barcode Reader to scan a new QR Code | |
| “Login” | Accesses the Microsoft Online SfB Authentication Page | |
| “Show Info” | Opens Built-in Diagnostics Panel | |
User’s Skype for Business Online Authentication and Terms of Use Acceptance |
||
| Voice Command | Action | |
| “Enter Username” | Fills in the username field using the Username information stored in the app | |
| “Set Password” | Fills in the password field using the Password information stored in the app | |
| “Reset Account” | Deletes stored user’s credentials and open the Bar Reader to scan a new credential QR Code | |
|
“Next” “Cancel” |
Proceeds to the next step Cancels the operation |
|
| “Sign In” | Proceeds with Authentication on SfB | |
|
”Yes” “No” |
Authorizes Stay Signed of SfB Account | |
|
“Accept Terms” “Decline Terms” |
Accepts the app Terms of Use Declines Terms of Use. Logout from SfB |
|
Note: Available voice commands are active only on the screens that display them
List of Contacts Operation |
|
|
Voice Command |
Action |
|
“Online Contacts” |
Shows online contacts ordered alphabetically |
|
“Recent Contacts” |
Shows recent called contacts ordered alphabetically |
|
“Contact Names” |
Shows all contacts ordered alphabetically |
|
“Contacts with ” |
Scrolls the contact list to the selected letter |
|
“Select “ “Select contact ” |
Selects a contact to call. The selected contact is highlighted in blue. In case of wrong selection, repeat the vocal prompt |
|
“Set busy/online” |
Sets the HMT User presence state, as shown in the upper left corner in green, orange. |
List of Main Operation and Call Initiation/Answering |
|
|
Voice Command |
Action |
|
“Go to settings” |
Opens the Camera Settings Panel |
|
“Start Call” |
Initiates a call with the selected contact. During the call, the selected contact is referred to as Remote Expert |
|
“Join Meeting” |
Initiates a call using a meeting link provided as a QR. |
|
“Exit” |
Dismisses the app. Does not logout from SfB |
|
“Logout” |
Logs out from SfB and dismiss the app |
|
“Answer call” “Decline call” |
Accepts an incoming call Declines the incoming call |
|
“Show Info” |
Opens Built-in Diagnostics Panel |
List of Menu Page Operation |
|
|
Voice Command |
Action |
|
“Reset Account” |
Deletes stored credentials and open the Barcode Reader to scan a new QR Code |
|
“Login” |
Accesses the Microsoft Online SfB Authentication Page |
|
“Show Settings” |
Opens the Camera Settings Panel |
|
“Show Info” |
Opens the Built-in Diagnostics Panel |
Live Audio/Video Collaboration and Instant Messaging Operation |
|
|
Voice Command |
Action |
|
“Terminate Call” |
Stops the current call and exit the meeting |
|
“Start/Stop Audio” |
Activates/Deactivates the device microphone. Incoming audio cannot be deactivated |
|
“Start/Stop My Stream” |
Shows/Hides the device own video stream, visible as Picture in Picture (PiP) |
|
“Select My Stream” |
Select the device own video stream to full screen |
|
“Select Participant ” “Select ” |
Sets the stream full screen |
|
“Show participants” |
Shows the Participants Panel and all participants stream |
|
“Show/Hide Chat” |
Shows/Hides the instant messaging chat panel |
|
“Write Message” |
Opens the vocal keyboard to dictate messages using the HMT-1 speech-to-text processor |
|
“Open Camera” |
Opens the HMT HD Camera and captures an image or record a video clip. Images/Video clips are uploaded immediately after the capture. The corresponding URL is sent via chat to the Remote Expert. |
|
“Show Info” |
Opens Built-in Diagnostics Panel |
Camera Operation |
|
|
Voice Command |
Action |
|
“Close Camera” |
Closes the camera panel |
|
“Show Settings” |
Opens the Camera Settings Panel |
|
“Take photo” |
Captures a still image. The image is immediately uploaded and a URL is placed on the meeting chat for downloading. Multiple images may be captured and uploaded |
|
“Record Video” |
Records a video clip. Maximum duration can be selected in the Settings Panel and the default length is set to 15 seconds. Multiple video clips can be recorded and uploaded |
|
“Zoom Level |
Executes the desired zoom level on the camera image |
Camera Settings Operation |
|
|
Voice Command |
Action |
|
“Hide Settings” |
Close the Camera Settings Panel |
|
“3 seconds | 5 seconds | 7 seconds” |
Timer duration for remote image capture. Current selection is shown in green |
|
“15 seconds | 30 seconds | 1 minute” |
Video clip duration. Current selection is shown in green |
|
“Video Low | Video Medium | Video High” |
Video quality settings. Current selection is shown in green |
|
“Image Low | Image Medium | Image High” |
Image quality settings. Current selection is shown in green |
VOICE COMMANDS IN BOLD
Skype for Business Desktop Operation
A Skype for Business desktop or mobile client can be used to place and receive calls to/from Fusion Remote running on a HMT
Key Features
Audio/video live communication
Instant messaging
Image/File sharing
Remote image capture
Call Quality of Service Monitoring
Fusion Remote perform Quality of Service (QoS) monitoring during calls to offer feedback to the user whenever network degradation occurs and adversely impact the quality of the audio or the video.
The following alerts and messages are displayed.
|
Message |
Alert Type |
Description |
|
“Poor Network Connection” |
Red bar below the Title Bar |
In the occurrence of degraded network connection, a red bar is displayed below the Title Bar for the duration of such occurrence. This bar mirrors the same one displayed by the Skype for Business desktop clients. The bar depends on the quality of the connection and link latency to/from the Skype for Business server. |
|
“Meeting Terminated Unexpectedly
Do you want to join the meeting again?” |
Modal dialog box |
If a meeting is terminated unexpectedly, a modal dialog box informs the user and prompts whether the meeting needs to be joined again or not. |
|
“Connection lost with Skype for Business Server
Meeting restart in progress.” |
Dialog box and spinner |
In the occurrence that the connection with the Skype for Business server is unavailable, the meeting is restarted automatically as soon as the connection is reestablished. A spinner is active to signal the action is in progress. |
Technical Support and Additional Resources
For additional technical support, please contact your Jujotech representative or write to:
support@jujotech.com.
Additional resources:
HMT User Guide and Support page: https://www.realwear.com/support
Skype for Business Meeting setup help page: https://support.office.com/en-us/article/set-up-a-skype-for-business-meeting-in-outlook-b8305620-d16e-4667-989d-4a977aad6556
Vuzix M300
Getting Started with Fusion Remote for Vuzix M300 XL
|
Operating System |
Android 6.0 Marshmallow |
|
Skype for Business online |
Microsoft Skype for Business Online 2015 Server |
|
Connectivity |
WiFi (2.4GHz/5GHz) or cellular hotspot connectivity (3G/4G) |
|
Supported Device |
Vuzix M300XL |
How to Prepare Skype for Business User’s Credentials for Use with Fusion Remote
Online Skype for Business Organization
Step 1: Generate the QR Code*[1] corresponding to your SfB username and password, using the following web service: https://fusionremote.YourDomain.com/. For POC and Trials, please access the page at https://fusionremote.jujotech.com
Step 2: On the web page, select the button “Skype for Business Credentials”
Step 3: If you have an Online Skype for Business Organization, select “Online Skype for Business“ on the top dropdown-box
Step4: Enter your Skype for Business Username and Password and hit Encrypt
Step 4: Save or Print the displayed AES encrypted QR Code
Step 5: After launching Fusion Remote, say “Scan QR Code” to scan the QR code you have generated and proceed with authentication
On-Premises Skype for Business Organization
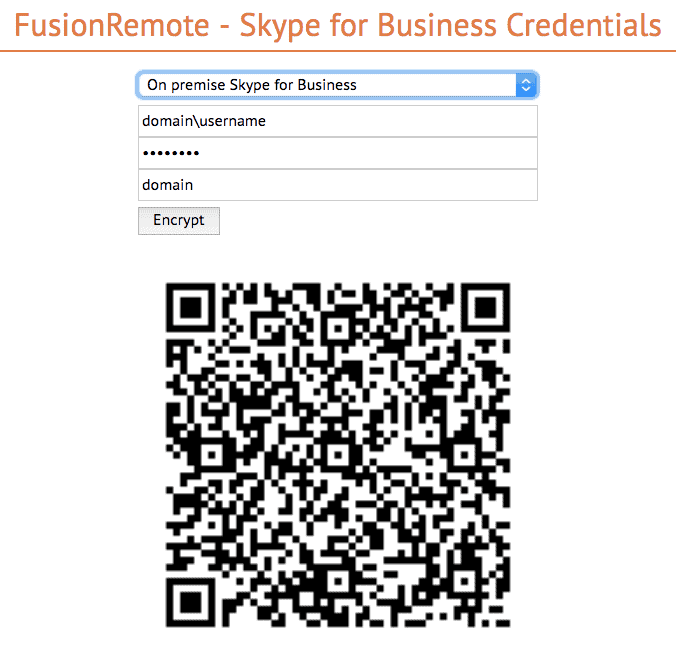
Step 1: Generate the QR Code*[2] corresponding to your SfB username and password, using the following web service: https://fusionremote.YourDomain.com/. For POC and Trials, please access the page at https://fusionremote.jujotech.com
Step 2: On the web page, select the button “Skype for Business Credentials”
Step 3: If you have an On-premises Skype for Business Organization, select “On-Premises Skype for Business” on the top dropdown-box
Step4: Enter your Skype for Business Username, Password, and Domain (domainusername) information; hit Encrypt
Step 4: Save or Print the displayed AES encrypted QR Code
Step 5: After launching Fusion Remote, say “Scan QR Code” to scan the QR code you have generated and proceed with authentication
[1] *QR Code: Quick Response Code used to store textual information, which can be decoded using image recognition software
[2] *QR Code: Quick Response Code used to store textual information, which can be decoded using image recognition software
Why Fusion Remote with Vuzix M300 XL is not working after a battery replacement?
Check that Time and Date are current after each firmware update or battery swap
Check that WiFi connection is active and with a working Internet connection
Contact Jujotech technical support at support@jujotech.com
How do I know that Fusion Remote is properly installed and operational on the Vuzix M300 XL?
Fusion Remote performs a diagnostics test on startup up. Once started, Fusion Remote will present its login screen if no error is found
How to Launch Fusion Remote on the Vuzix M300 XL
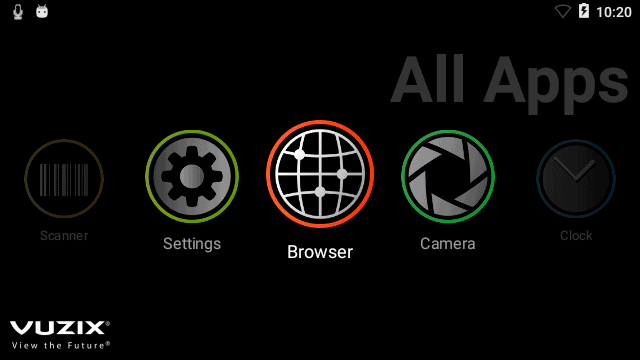
Step 1 Long press (approx. 1 sec) on the center button to access the “Home Screen (Figure 1)
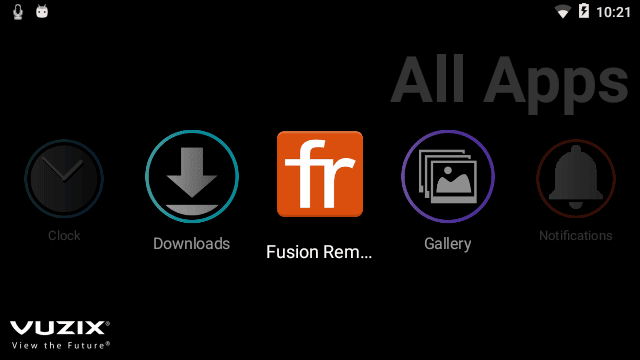
Step 2 Short press the front or center button to scroll through the apps available (Figure 2)
Step 3 Locate Fusion Remote icon on the HEADSET Application Screen (Figure 2)
Step 4 Short press the back button to start the application
(fig. 1)
(fig. 2)
VOICE COMMANDS IN BOLD
How to Acquire User’s Skype for Business Credentials
Once Fusion Remote has launched for the first time, the Scan QR Code Panel is displayed, as shown in Figure 1
Step 1: “Scan QR Code” to open the integrated Barcode Scanner, as shown in Figure 2
Step 2: Focus on the target QR Code and wait for the HMT feedback sound
Step 3: Once the QR Code is acquired and credentials verified, the username is displayed in Microsoft Skype for Business Login screen.
For On-Premises Skype for Business Organizations, authentication will immediately follow Step 3 and the user will be presented with the Contact List Screen on successful authentication. Please proceed with Section E “How to operate the Contact List” in this case.
For Online Skype for Business Organizations, authentication will follow the steps described in Section D “How to Authenticate on Microsoft Online Skype for Business Organization”.
(Fig. 1)

(Fig.2)
VOICE COMMANDS IN BOLD
How to Authenticate on Microsoft Online Skype for Business Server
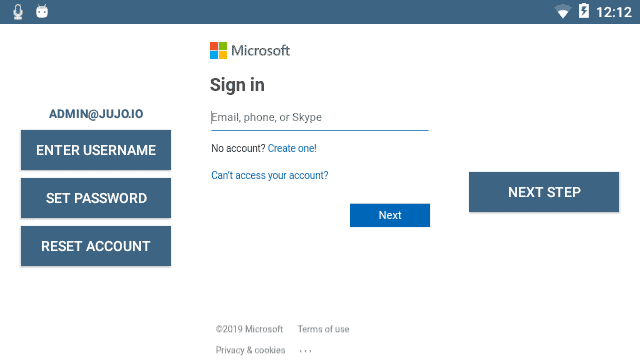
Once Fusion Remote has launched for the first time, the Scan QR Code Panel is displayed, as shown in Figure 1. For each of the following steps, either use the voice command or the front/center buttons to navigate the corresponding button and then the back button to click that button
Step 1: “Enter Username” fills in the username field
Step 2: “Next Step” proceeds to step 3
Step 3: “Set Password” fills in the password field
Step 4: “Next Step” executes authentication. If successful, proceeds to step 5; otherwise reenter password (Step 4) or restart from Step 1, as instructed
Step 5: “Yes” maintains authentication after exiting Fusion Remote and proceeds to step 6
“No” requires authentication after exiting Fusion Remote and to proceeds to step 6
Step 6: “Accept Terms” completes process and proceeds to Contact List
“Decline Terms” cancels the process and returns to Step 1
(Fig. 1 – Initial Microsoft Login Screen)
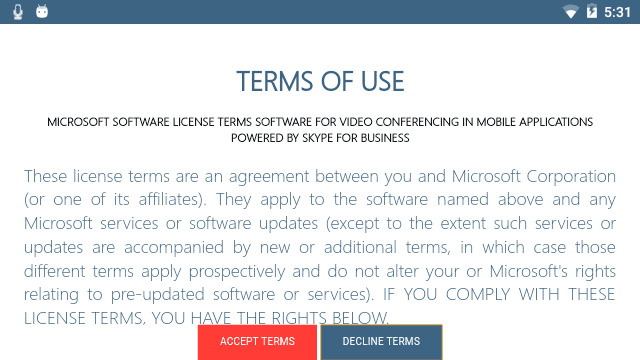
(Fig.2 – EULA Acceptance Screen)
Note: In case a step fails, say “Navigate Back” and repeat the step
VOICE COMMANDS IN BOLD
How to Operate the Contact list
Upon successful authentication, the user’s list of SfB contacts will be displayed, along with user’s presence and login info (upper right corner in Figure 1) and actions
Contact list can be filtered using the following voice commands or selecting the corresponding button using the front/center buttons to navigate and then the back button to click that button:
“ONLINE CONTACTS” online contact ordered alphabetically
“RECENT CONTACTS” recent contact ordered alphabetically
“CONTACT NAMES” all contact ordered alphabetically
“CONTACTS WITH “ to scroll the list to the first name starting by
“PAGE UP/DOWN” to scroll up/down a long list of contacts
A contact name can be selected even if not in the visible portion of the Contact List by using the corresponding voice command.
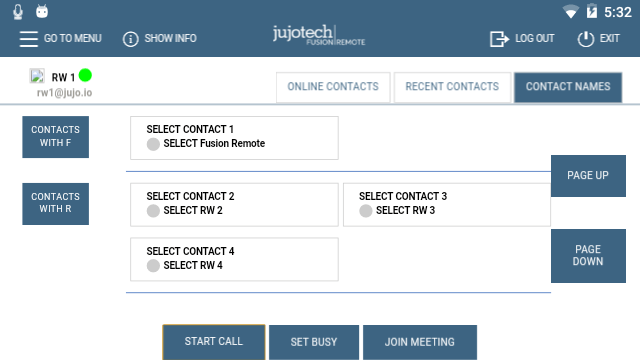
(Fig. 1 – List of Contacts)
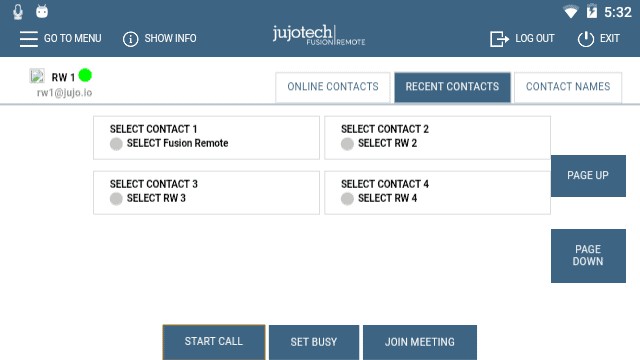
(Fig. 2 – Ordered List of contacts)
VOICE COMMANDS IN BOLD
Step 1: “SELECT ” or “SELECT contact ” starts a call (Figure 1).
In case of selection error, simply repeat. The selected contact will be highlighted
Step 2: “START CALL” initiates a call with the selected contact
The interface during a live call (Figure 2) offers the following commands. These commands are only available via the push buttons. Use the front/center buttons to loop through the commands available in the view. The selected command will be highlighted in red. Then execute the command by clicking on the back button.
“STOP/START AUDIO” manages the HEADSET microphone
“STOP/START STREAM” manages the PIP Stream
“SELECT MY STREAM” selects the HEADSET stream to full screen (not available in this version)
“SHOW INFO” displays Information Panel
“SHOW/HIDE CHAT” shows/hides the Instant Messaging panel
“STOP CALL” stops the call
“SHOW PARTICIPANTS” shows Participants Panel
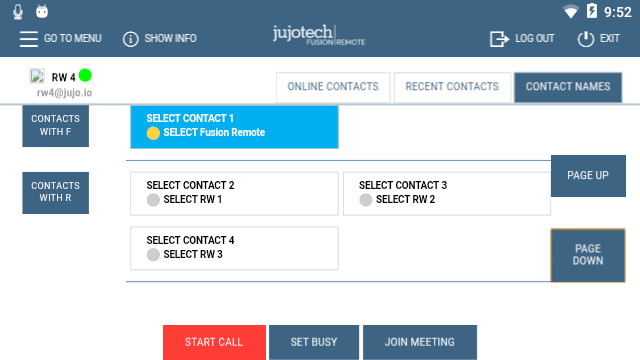
(Fig.1 – Call Initiation)
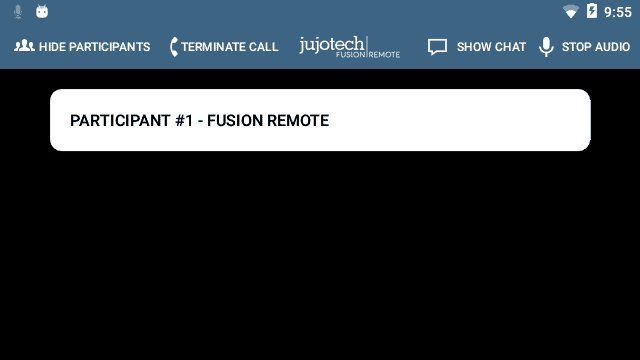
(Fig. 2 – Participants selection during multicast)
VOICE COMMANDS IN BOLD
Live Call – How to Use the Instant Messaging
Text messages and files can be received from the Remote Expert and the Fusion Remote user using the integrated Instant messaging panel (chat). The following commands are available via the push buttons. Use the front/center buttons to loop through the commands available in the view. The selected command will be highlighted in red. Then execute the command by clicking on the back button.
Step 1: “Show Chat” opens the Instant Messaging panel
Step 2: “Download Image ” downloads the corresponding image into the M300
Step 3: “Save/Delete photo” saves/deletes the downloaded photo into the M300
Step 4: “Hide Chat” hides the Instant Messaging panel
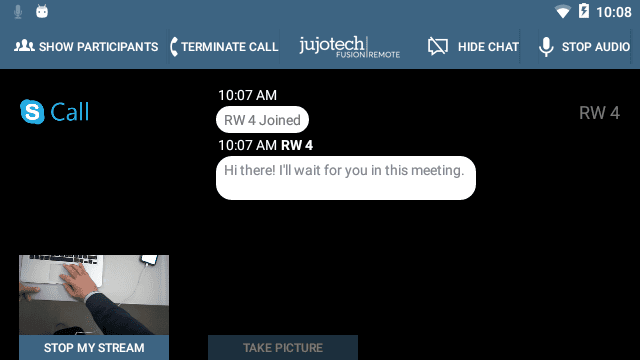
(Fig. 1 – Instant Messaging)
VOICE COMMANDS IN BOLD
Live Call – How to Capture and Share an Image or Video Clip
Images can be captured and exchanged between the Remote Expert and the Fusion Remote user using the following commands. These commands are only available via the push buttons. Use the front/center buttons to loop through the commands available in the view. The selected command will be highlighted in red. Then execute the command by clicking on the back button.
Step 1: “Open Camera” opens the HD camera (Figure 1). This command is also available in the Chat Panel
Step 3: “Take Photo” captures a still image (Figure 2). The image is immediately uploaded and a URL is placed on the meeting chat for downloading. Multiple images may be captured and uploaded
Step 4: “Record Video” records a video clip. Maximum duration can be selected in the Settings Panel and the default length is set to 15 seconds. Multiple video clips can be recorded and uploaded
Step 5: “Close Camera” closes the Camera Panel
Additional commands:
“Show Settings” opens camera settings panel. This command is also available in the Main Menu panel (from Contact List/Goto Menu)
“Zoom Level ” executes the desired zoom level on the camera image
(Fig. 1 – Camera Panel)
(Fig. 2 – Record Video Clip)
VOICE COMMANDS IN BOLD
Reference Section – List of Available Commands
Voice Commands
User’s Skype for Business Credentials Acquisition
| Voice Command | Action | |
| “Scan QR Code” | Scans an encrypted QR Code with User’s SfB Credentials | |
| “Reset Account” | Deletes stored credentials and open the Barcode Reader to scan a new QR Code | |
| “Login” | Accesses the Microsoft Online SfB Authentication Page | |
| “Show Info” | Opens Built-in Diagnostics Panel | |
User’s Skype for Business Online Authentication and Terms of Use Acceptance
| Voice Command | Action | |
| “Enter Username” | Fills in the username field using the Username information stored in the app | |
| “Set Password” | Fills in the password field using the Password information stored in the app | |
| “Reset Account” | Deletes stored user’s credentials and open the Bar Reader to scan a new credential QR Code | |
|
“Next Step” “Cancel” |
Proceeds to the next step Cancels the operation |
|
|
“Accept Terms” “Decline Terms” |
Accepts the app Terms of Use Declines Terms of Use. Logout from SfB |
|
Note: Available voice commands are active only on the screens that display them
Available Commands
List of Contacts Operation
| Voice Command | Action |
| “Online Contacts” | Shows online contacts ordered alphabetically |
| “Recent Contacts” | Shows recent called contacts ordered alphabetically |
| “Contact Names” | Shows all contacts ordered alphabetically |
| “Contacts with ” | Scrolls the contact list to the selected letter |
|
“Select “ “Select contact ” |
Selects a contact to call. The selected contact is highlighted in blue. In case of wrong selection, repeat the vocal prompt |
| “Set busy/online” | Sets the HEADSET User presence state, as shown in the upper left corner in green, orange |
|
“Scroll Up” “Scroll Down” |
Scrolls the contact page up or down |
List of Main Operation and Call Initiation/Answering
| Voice Command | Action |
| “Go to menu” | Navigates to the Menu Page |
| “Start Call” | Initiates a call with the selected contact. During the call, the selected contact is referred to as Remote Expert |
| “Join Meeting” | Initiates a call using a meeting link provided as a QR. |
| “Exit” | Dismisses the app. Does not logout from SfB |
| “Logout” | Logs out from SfB and dismiss the app |
|
“Accept call” “Decline call” |
Accepts an incoming call Declines the incoming call |
| “Show Info” | Opens Built-in Diagnostics Panel |
List of Menu Page Operation |
|
| Voice Command | Action |
| “Reset Account” | Deletes stored credentials and open the Barcode Reader to scan a new QR Code |
| “Login” | Accesses the Microsoft Online SfB Authentication Page |
| “Show Info” | Opens the Built-in Diagnostics Panel |
Live Audio/Video Collaboration and Instant Messaging Operation
These commands are only available via the push buttons. Use the front/center buttons to loop through the commands available in the view. The selected command will be highlighted in red. The execute the command by clicking on the back button.
| Voice Command | Action |
| “Terminate Call” | Stops the current call and exit the meeting |
| “Start/Stop Audio” | Activates/Deactivates the device microphone. Incoming audio cannot be deactivated |
| “Start/Stop My Stream” | Shows/Hides the device own video stream, visible as Picture in Picture (PiP) |
| “Select My Stream” | Select the device own video stream to full screen (Not available in current version) |
| “Participant ” | Sets the stream full screen |
| “Show/Hide participants” | Shows/HIdes the Participants Panel and all participants stream |
| “Show/Hide Chat” | Shows/Hides the instant messaging chat panel |
| “Write Message” | Opens the vocal keyboard to dictate messages using the HEADSET-1 speech-to-text processor |
| “Open Camera” | Opens the HEADSET HD Camera and captures an image or record a video clip. Images/Video clips are uploaded immediately after the capture. The corresponding URL is sent via chat to the Remote Expert. |
| “Show Info” | Opens Built-in Diagnostics Panel |
Camera Operation
These commands are only available via the push buttons. Use the front/center buttons to loop through the commands available in the view. The selected command will be highlighted in red. The execute the command by clicking on the back button.
| Voice Command | Action |
| “Close Camera” | Closes the camera panel |
| “Show Settings” | Opens the Camera Settings Panel |
| “Take photo” | Captures a still image. The image is immediately uploaded and a URL is placed on the meeting chat for downloading. Multiple images may be captured and uploaded |
| “Record Video” | Records a video clip. Maximum duration can be selected in the Settings Panel and the default length is set to 15 seconds. Multiple video clips can be recorded and uploaded |
| “Zoom Level | Executes the desired zoom level on the camera image |
Camera Settings Operation
These commands are only available via the push buttons. Use the front/center buttons to loop through the commands available in the view. The selected command will be highlighted in red. The execute the command by clicking on the back button.
| Voice Command | Action |
| “Hide Settings” | Close the Camera Settings Panel |
| “3 seconds | 5 seconds | 7 seconds” | Timer duration for remote image capture. Current selection is shown in green |
| “15 seconds | 30 seconds | 1 minute” | Video clip duration. Current selection is shown in green |
| “Video Low | Video Medium | Video High” | Video quality settings. Current selection is shown in green |
| “Image Low | Image Medium | Image High” | Image quality settings. Current selection is shown in green |
Skype for Business Desktop Operation
A Skype for Business desktop or mobile client can be used to place and receive calls to/from Fusion Remote running on a HMT
Key Features
Audio/video live communication
Instant messaging
Image/File sharing
Remote image capture
How to place a call to Fusion Remote on Windows
Step 1: To start a meeting with an HEADSET click on the “Meet Now” command in the “Conversations” Menu (Figure 1)
Step 2: Click on the “People” icon (Figure 2)
Step 3: Search the HEADSET contact name among the contacts using the “Invite more people” search box (Figure 2)
Step 4: Double click on the desired contact name shown in the result list. Repeat to add more HEADSET contacts to the call
The meeting is now live.
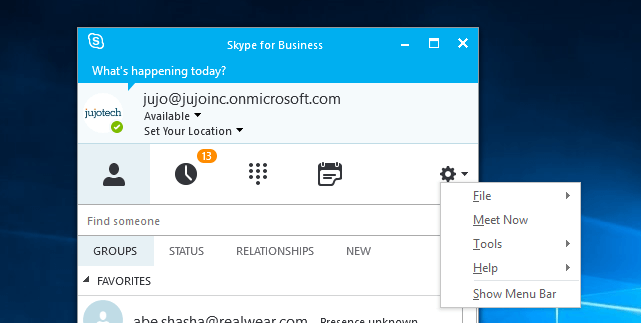
(Fig. 1)
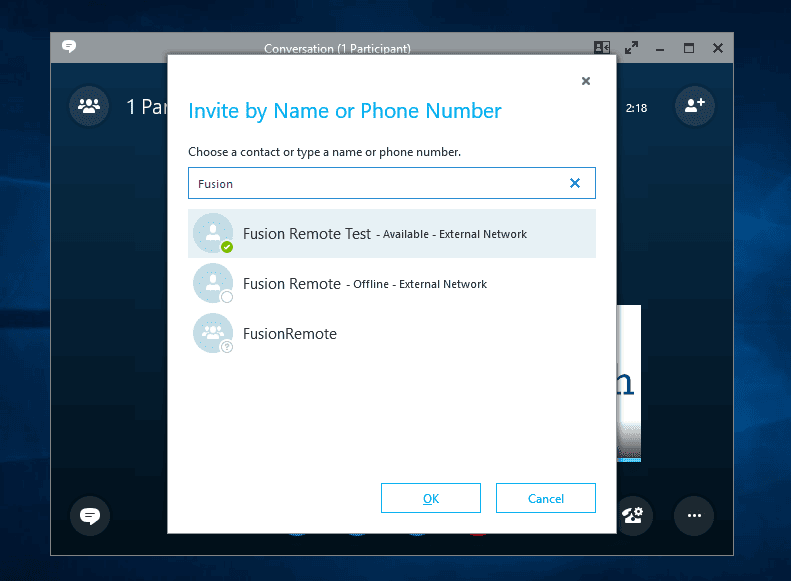
(Fig. 2)
How to Place a Call to Fusion Remote on Mac
Step 1: To start a meeting with an HEADSET click on the “Meet Now” command in the “Conversations” Menu (Figure 1)
Step 2: Click on the “People” icon (Figure 2)
Step 3: Search the HEADSET contact name among the contacts using the “Invite more people” search box (Figure 2)
Step 4: Double click on the desired contact name shown in the result list. Repeat to add more HEADSET contacts to the call
The meeting is now live.

(Fig. 1)
(Fig. 2)
Using Instant Messaging on Windows
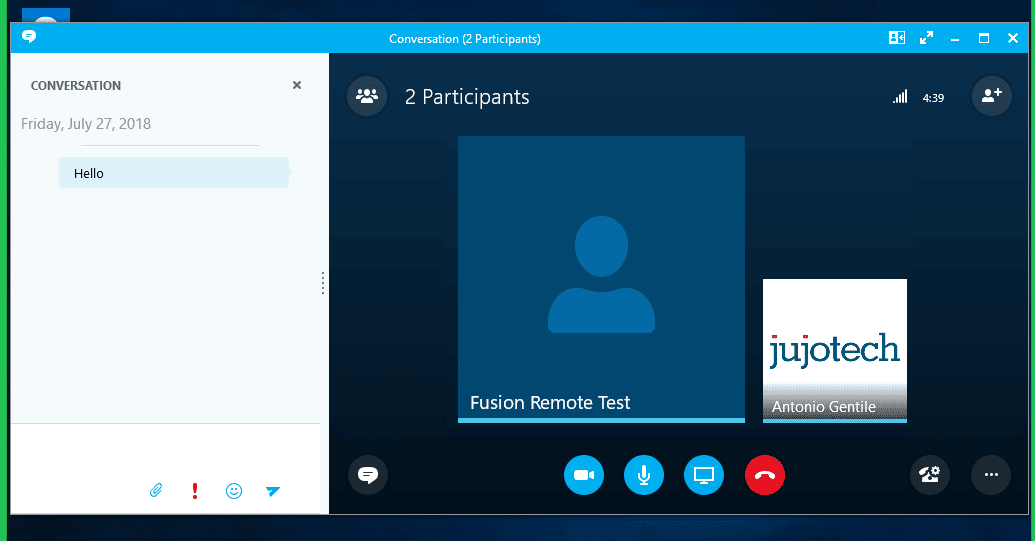
Step 1: Click on the “Messages” icon to start a instant messaging session with everybody on a meeting (Figure 1)
Step 2: Use the text box provided to send and receive text messages
Remote Image Capture
An HD still image can be captured on the HEADSET without the user intervention
Step 1: Write the command “takephoto” in the chat. The HEADSET will capture an image and send it as URL on the chat
Step 2: Access the image by clicking on the URL link provided
(Fig.1)
Using Instant Messaging on a Mac
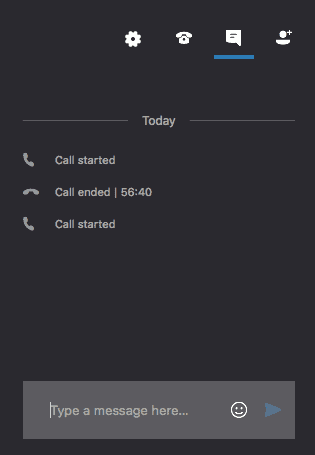
Step 1: Click on the “Messages” icon to start a instant messaging session with everybody on a meeting (Figure 1)
Step 2: Use the text box provided to send and receive text messages
Remote Image Capture
An HD still image can be captured on the HEADSET without the user intervention
Step 1: Write the command “takephoto” in the chat. The HEADSET will capture an image and send it as URL on the chat
Step 2: Access the image by clicking on the URL link provided
(Fig.1)
Image/File Sharing
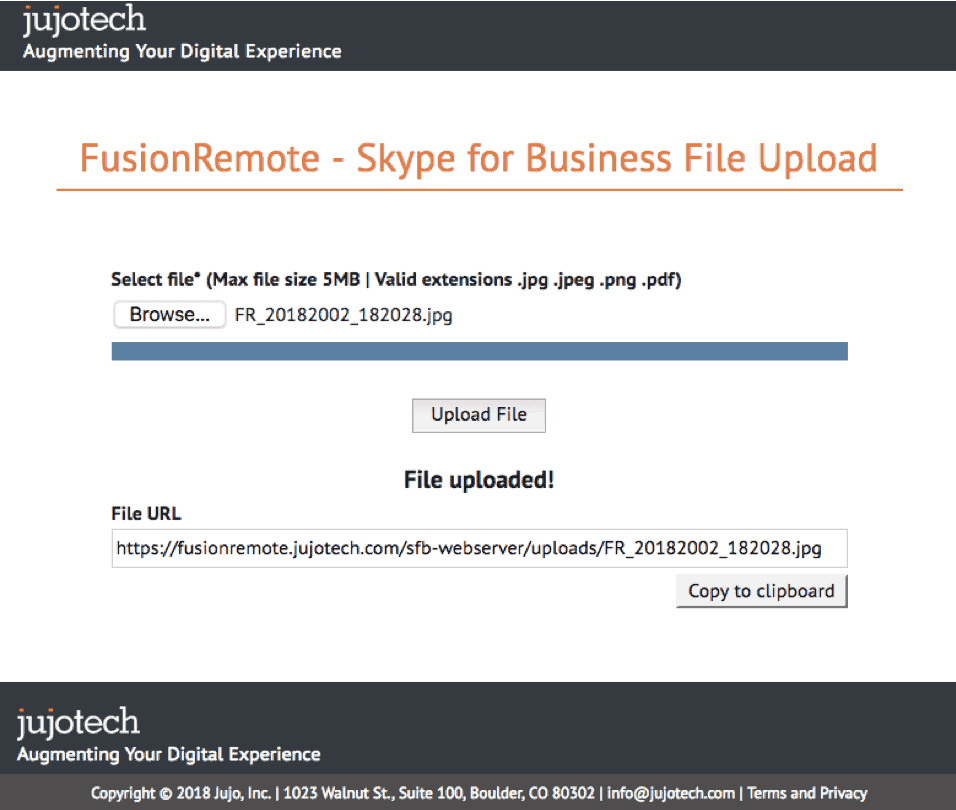
Step 1: Clicking the “Skype for Business File Upload” button on the Fusion Remote service page at https://fusionremote.YourDomain.com to share files/images with the HEADSET. For POC or Trials, a temporary service is offered at the following URL: http://fusionremote.jujotech.com
Step 2: Click the “Browse” button on the Fusion Remote service page to search for the file/image to share
Step 3: Click the “Upload” button on the Fusion Remote service page to upload the file/image on the service
Step 4: Click on the “Copy to clipboard” button to copy the generated URL on the clipboard
Step 5: Paste the URL into the message box to share it with the meeting participants.
Call Quality of Service Monitoring
Fusion Remote perform Quality of Service (QoS) monitoring during calls to offer feedback to the user whenever network degradation occurs and adversely impact the quality of the audio or the video.
The following alerts and messages are displayed.
|
Message |
Alert Type |
Description |
|
“Poor Network Connection” |
Red bar below the Title Bar |
In the occurrence of degraded network connection, a red bar is displayed below the Title Bar for the duration of such occurrence. This bar mirrors the same one displayed by the Skype for Business desktop clients. The bar depends on the quality of the connection and link latency to/from the Skype for Business server. |
|
“Meeting Terminated Unexpectedly
Do you want to join the meeting again?” |
Modal dialog box |
If a meeting is terminated unexpectedly, a modal dialog box informs the user and prompts whether the meeting needs to be joined again or not. |
|
“Connection lost with Skype for Business Server
Meeting restart in progress.” |
Dialog box and spinner |
In the occurrence that the connection with the Skype for Business server is unavailable, the meeting is restarted automatically as soon as the connection is reestablished. A spinner is active to signal the action is in progress. |
Technical Support and Additional Resources
For additional technical support, please contact your Jujotech representative or write to:
support@jujotech.com.
Additional resources:
Vuzix M300 User Guide and Support page: www.vuzix.com/pages/support/
Skype for Business Meeting setup help page: https://support.office.com/en-us/article/set-up-a-skype-for-business-meeting-in-outlook-b8305620-d16e-4667-989d-4a977aad6556.
Service request
Set up a Service Request Ticket by filling in this form
NEED SOME HELP?
Send us a quick message